The SAAF Forum

Discussion on the SAAF and other southern African air forces.
It is currently 19 Apr 2024, 05:21

All times are UTC + 2 hours


Post new topic Reply to topic  [ 108 posts ]  Go to page Previous  1 ... 4, 5, 6, 7, 8  Next
Author Message
PostPosted: 01 Jul 2013, 18:52 
Offline

Joined: 03 Apr 2013, 18:00
Posts: 641
WOW :shock: :shock: :shock: Excellent work.


Top
 Profile  
Reply with quote  
PostPosted: 02 Jul 2013, 20:24 
Offline
User avatar

Joined: 01 Sep 2011, 16:27
Posts: 329
Location: Pretoria
Although it feels like i seem to be the only brush painter left... I thought i'll share this idea just for interests sakes....

If you want to minimize brush strokes or get a smoother result when painting large areas. I used a small sponge particularly the sponge found inside the medicine bottles.

Thin abit of tamiya acrylic inside a large lid or a flat surface... Dab the sponge onto paint and appply paint to the areas like how one would do so using a brush, but in one direction only. refrain from squeezing the sponge. Using this method..... alittle goes a long way. With awesome results. My current build, The 'JUg", has the result of this method in olive drab.


For whatever it was worth peeps... :smt023

_________________
The sky is not the limit...
There is no limit...


Top
 Profile  
Reply with quote  
PostPosted: 04 Jul 2013, 12:09 
Offline

Joined: 03 Apr 2013, 18:00
Posts: 641
Sponge in medicine bottles???? :shock: :shock: What meds are you on?


Top
 Profile  
Reply with quote  
PostPosted: 04 Jul 2013, 12:52 
Offline
User avatar

Joined: 01 Sep 2011, 16:27
Posts: 329
Location: Pretoria
Lol in my vitamin bottles... Will upload a pic later tonight...

_________________
The sky is not the limit...
There is no limit...


Top
 Profile  
Reply with quote  
PostPosted: 22 Jul 2013, 06:59 
Offline
User avatar

Joined: 02 Jul 2012, 09:54
Posts: 2193
Location: Cape Town
Good tip thx Red.

I on the otherhand, wants brush strokes when I paint my 32nd scale Sopwith. :-) yep, I'm brush painting her, entirely.


Top
 Profile  
Reply with quote  
PostPosted: 22 Jul 2013, 08:02 
Offline

Joined: 01 Apr 2012, 04:49
Posts: 2859
Location: Richmond, New Zealand
Make sure you use a very good broad brush......seen some real disasters with people brush painting WWI subjects with bad brushes and paint/thinner mix!


Top
 Profile  
Reply with quote  
PostPosted: 22 Jul 2013, 11:25 
Offline
User avatar

Joined: 02 Jul 2012, 09:54
Posts: 2193
Location: Cape Town
vlamgat16 wrote:
Make sure you use a very good broad brush......seen some real disasters with people brush painting WWI subjects with bad brushes and paint/thinner mix!


7mm broad brush hard bristle. Did undersides of wings and it doesn't look too bad. Might need a 2nd coat though. 60/40 thinners mix seems to have done the trick.


Top
 Profile  
Reply with quote  
PostPosted: 30 Jul 2013, 18:41 
Offline

Joined: 31 Aug 2010, 15:01
Posts: 4908
Location: Centurion, Pretoria, SA
Cobusvj wrote:
I defer to Drifter on the price, I can only recall that it is less than R100 for a 250ml bottle. That goes a long way. And is brilliant for cleaning an airbrush.

Remember using other lacquer thinners will be like experimenting, it may or may not go well whereas using the Tamiya lacquer thinner is using a product designed to be used with Tamiya acrylics so worth the cost IMO.


Oi Cobus, when you joining us at GRSM monthly meet ? Last Saturday each month at war museum in Joeys.


Top
 Profile  
Reply with quote  
PostPosted: 31 Jul 2013, 00:52 
Offline

Joined: 23 Apr 2012, 07:30
Posts: 27
Location: NSW, Australia
Thanks for this thread, guys. I've 'threatened' to get back into building several times over the past five years. It's always come to nothing due to a lack of time but I have managed to invest in additions to the stash and tools and paint etc. These days the hobby is limited to reading Finescale Modeler and here and dreaming.

When I do get back into it - might move house soon so should have the room to set up - this thread will be a one-stop quick reference guide for me (and I still want to build the old Airfix 1/72 SAAF Boston first!). Thanks again.

_________________
http://aircrewbookreview.blogspot.com/


Top
 Profile  
Reply with quote  
PostPosted: 12 Aug 2013, 10:00 
Offline

Joined: 07 Feb 2013, 20:37
Posts: 196
Location: All over the shop
WHAT? You agaaaaiiinnn???

:P

Thanks for the kind words, but bear with me, because that's a huge fuselage with plenty of scope to completely f@£k it up..

I'm employing hairspray as my current favourite weathering tool. Especially when it comes to chipped areas it's very handy, but also when I'm doing subtle colour modulation.. The hairspray acts as a dissolvable layer between layers of paint. It's imperative this is only done via airbrush!!

I've illustrated my method, with materials I use, but these can be substituted for whatever materials you're comfortable with. I must add, I haven't tried this with enamels yet, primarily because I loathe enamels.
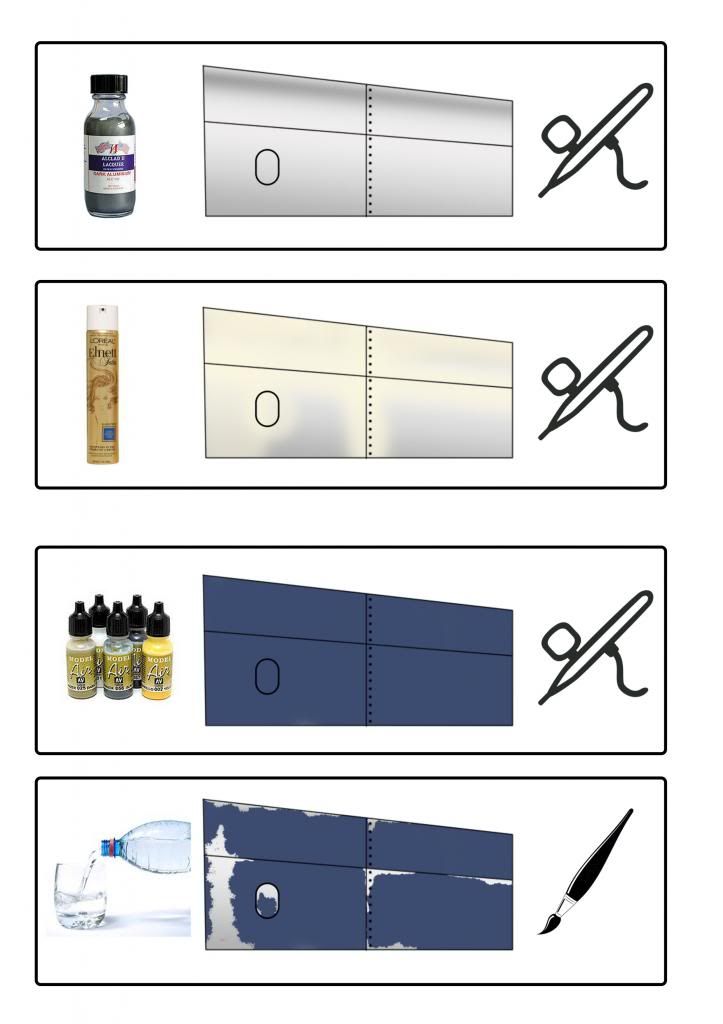
Step 1: Base layer.
Your base layer will be the underlying colour coming through the top layer. So that'd be aluminium for aircraft (or primer, or both..), a dark brown for armour, or any manner of previous colour scheme.

Step 2: Hairspray.
I find decanting hairspray into the airbrush helps to create an even, more localised application than just simply blitzing the kit with it directly from the can. There's no preference in hairspray. There are several chipping fluids now on the market, but hairspray is available cheaply from anywhere up to and including petrol stations.

Step 3: Top coat.
Paint it in whatever you were intending do now. This can include preshading (something I generally don't bother with) and any other fancy tricks you enjoy.

Step 4: Water
When the top coat is dry (enough.. :) ) you then take a brush loaded with water and gently scrub the areas you want chipped.. Be it walk ways, inspection hatches or leading edges. If you want a certain panel to be more chipped than another, then you can even mask the edge to a degree.

Step 5: Seal
Not illustrated, but it's the next step in the process anyway. Seal with the clear of your choice and continue as normal..

Or:

If, for instance, you want to have a primer showing as well as bare metal showing, do steps 1-5 for areas you want to have the primer showing, but use the primer colour as the top coat. Then seal and repeat steps 2-5 with the eventual top coat colour.

Image


Top
 Profile  
Reply with quote  
PostPosted: 13 Aug 2013, 10:07 
Offline

Joined: 07 Feb 2013, 20:37
Posts: 196
Location: All over the shop
When applying the top coat, it's imperative that it's airbrushed!

The reason for this is twofold:

1: The paint is thin and even enough to be able to be scrubbed away with the minimum of effort
2: You don't dissolve, and subsequently remove, the hairspray with the solvents in the brush.

The way it works is that because hair spray is water (or any other liquid, for that matter) soluble, it denies the paint on top of it of a hold of the layer underneath. So when you gently scrub at it with a regular paint brush which is damp with water, the paint, which now will have no foundations anymore, will chip away as the hairspray dissolves. The trick is to gently work at it, take your time and quit when you start to wonder if you should add more.


Top
 Profile  
Reply with quote  
PostPosted: 16 Aug 2013, 21:57 
Offline

Joined: 31 Aug 2010, 15:01
Posts: 4908
Location: Centurion, Pretoria, SA
Okes, do yourselves a favor and buy some micomesh cloth. You get it up to 12,000 grade which is superfine. Once you've airbrushed your nice new model with nasty grainy matt paints, give the surface a once over with a wet micromesh cloth. Surface becomes smooth as glass. No more silvering of decals. Available at Jix.


Top
 Profile  
Reply with quote  
PostPosted: 19 Feb 2014, 22:21 
Offline

Joined: 08 Mar 2009, 05:05
Posts: 3549
Location: Canada
This is one way of mixing your paint.
I got this meat cutter from a used items store, attached a jar where I place my paint, and fire away.
Works really well for me.

Image


Last edited by jeffreynic on 22 Feb 2014, 01:15, edited 1 time in total.

Top
 Profile  
Reply with quote  
PostPosted: 22 Feb 2014, 00:21 
Offline
User avatar

Joined: 02 Jul 2012, 09:54
Posts: 2193
Location: Cape Town
That's my kind of tool. Mix paint AND make lunch at the same time. Lekke man, lekke!!! :smt023

Thanks for the Micromesh tip M.


Top
 Profile  
Reply with quote  
PostPosted: 09 Mar 2014, 15:08 
Offline
User avatar

Joined: 02 Mar 2013, 20:42
Posts: 447
Location: jhb south africa
Hi chaps don't know what you use to rescribe panel lines around a fuselage but can I recommend that you try a saw blade.
Image
Image
(I got this years ago from a hobby shop, I think excell, it came in a plastic tube) in a holder, and you just gently saw it around the part going harder as the line gets established.
The harder areas around the join keep the blade from sinking into softer plastic or filler and you get a clean scribe.
Sand with fine grit and remove any build up with a toothpick.
You can even deepen lines that are too shallow this way.
I even use it to scribe older raised panel lines on kits like monogram.
Just scribe along the line, slowly going deeper until desired depth is achieved.
Then sand away raised lines and polish/clean new lines with toothpick.
Hope this is useful

G


Top
 Profile  
Reply with quote  
Display posts from previous:  Sort by  
Post new topic Reply to topic  [ 108 posts ]  Go to page Previous  1 ... 4, 5, 6, 7, 8  Next

All times are UTC + 2 hours


Who is online

Users browsing this forum: No registered users and 5 guests


You cannot post new topics in this forum
You cannot reply to topics in this forum
You cannot edit your posts in this forum
You cannot delete your posts in this forum

Search for:
Jump to:  
cron
Powered by phpBB® Forum Software © phpBB Group