The SAAF Forum

Discussion on the SAAF and other southern African air forces.
It is currently 19 Apr 2024, 05:27

All times are UTC + 2 hours


Post new topic Reply to topic  [ 16 posts ]  Go to page 1, 2  Next
Author Message
PostPosted: 02 Dec 2018, 14:28 
Offline
User avatar

Joined: 17 Dec 2012, 23:13
Posts: 56
Location: Aylesbury United Kingdom
Inspired by Kremlin’s post http://www.saairforce.co.za/forum/viewtopic.php?f=14&t=2760&start=120

I bought this lovely kit from Wonderland Models at the IPMS Nationals “Scale Modelworld” in Telford last month. As you will read in his post AX-B was flown by Dickie Richards and Dave Hastie who each had a kill in her. Dickie Richards a Me.410 and Dave Hastie a FW-190.

Image

Also bought the Montex masks and a few other bits from Barracudacals and Master.

Image


Image

Montex show the camo to be Dark Earth/Middle Stone over Azure Blue, perhaps an error they picked up from Xtradecal. I would love to paint it in this scheme. However, to my knowledge the SAAF received most of their Mk.VIII’s in the Ocean Sea Grey/Dark Green over Medium Sea Grey and only 2 in Medium Sea Gray over PRU Blue and all my references show that. I am keen to know which colour scheme is correct for this subject?


Top
 Profile  
Reply with quote  
PostPosted: 08 Dec 2018, 23:16 
Offline
User avatar

Joined: 22 May 2018, 17:45
Posts: 98
Location: Czech Republic
I am looking forward to your progress on such a nice kit :smt023


Top
 Profile  
Reply with quote  
PostPosted: 09 Dec 2018, 13:10 
Offline
User avatar

Joined: 17 Dec 2012, 23:13
Posts: 56
Location: Aylesbury United Kingdom
patrikf wrote:
I am looking forward to your progress on such a nice kit :smt023


I will start posting some progress pics soon. Busy doing a few mods for the seat frame at the moment.


Top
 Profile  
Reply with quote  
PostPosted: 09 Dec 2018, 23:57 
Offline
User avatar

Joined: 17 Dec 2012, 23:13
Posts: 56
Location: Aylesbury United Kingdom
I have found a few very nice photos of JF294 that is at the South African National Museum of Military History on the net so will use these as reference where possible. JF294 was also on the same production run, only around thirteen ahead of JF322 (JF301 to JF315 was never used on Mk.VIII's), so you won't find a better reference when modelling JF322

Tamiya's Rudder Pedal Assembly setup is fairly bulky so I superglued some rod into where the pedals will be glued and then thinned it down with cutting and sanding.

Image

Next is the seat framing as per the real thing below.

Image

The frame is created by folding a small piece of metal from a beer tin over a 15cm stainless steel ruler then shaping it, after that I drilled a few holes as seen in the real thing above. This is will be joined together using very small gauges of Albion Alloy tube using a telescoping technique.

Image

I have also slightly modified the framing behind the pilots head to look more like that of the Mk.VIII JF294.

Image


Top
 Profile  
Reply with quote  
PostPosted: 10 Dec 2018, 06:49 
Offline
Site Admin
User avatar

Joined: 29 Jun 2004, 17:19
Posts: 8397
jamesb557 wrote:

The frame is created by folding a small piece of metal from a beer tin over a ...

The sacrifices one must make for the furtherance of our hobby. :lol:

_________________
How come every time my ship comes in, I'm at the airport?


Top
 Profile  
Reply with quote  
PostPosted: 10 Dec 2018, 15:11 
Offline
User avatar

Joined: 17 Dec 2012, 23:13
Posts: 56
Location: Aylesbury United Kingdom
Dean wrote:
jamesb557 wrote:

The frame is created by folding a small piece of metal from a beer tin over a ...

The sacrifices one must make for the furtherance of our hobby. :lol:

Tell me about it. However the contents were disposed of in an acceptable and correct manner. As per SAAF regulations :D :smt023


Top
 Profile  
Reply with quote  
PostPosted: 26 Apr 2020, 21:10 
Offline

Joined: 26 Apr 2020, 20:56
Posts: 2
Hi James

Dickie Richards was my grandfather (my moms father ) I have many pictures and his original flying gear , was wonderful to see your post have you building his plane Billy boy and then my first golden retriever Billy after his plane. He received the DFC twice. I spent A lot of time listening to his war stories he told them so well
Dave Hastie was his best friend and was one of the few at his funeral. His wife is still alive , living in Pretoria South Africa

I would love to see the completed model
Regards Lloyd Henry


jamesb557 wrote:
Inspired by Kremlin’s post http://www.saairforce.co.za/forum/viewtopic.php?f=14&t=2760&start=120

I bought this lovely kit from Wonderland Models at the IPMS Nationals “Scale Modelworld” in Telford last month. As you will read in his post AX-B was flown by Dickie Richards and Dave Hastie who each had a kill in her. Dickie Richards a Me.410 and Dave Hastie a FW-190.

Image

Also bought the Montex masks and a few other bits from Barracudacals and Master.

Image


Image

Montex show the camo to be Dark Earth/Middle Stone over Azure Blue, perhaps an error they picked up from Xtradecal. I would love to paint it in this scheme. However, to my knowledge the SAAF received most of their Mk.VIII’s in the Ocean Sea Grey/Dark Green over Medium Sea Grey and only 2 in Medium Sea Gray over PRU Blue and all my references show that. I am keen to know which colour scheme is correct for this subject?


Image


Top
 Profile  
Reply with quote  
PostPosted: 02 May 2020, 22:26 
Offline
User avatar

Joined: 17 Dec 2012, 23:13
Posts: 56
Location: Aylesbury United Kingdom
Hi Lloyd

Thank you for responding on my post, you must be very proud. Wow, I would love to know your granddad’s stories and see his photos and gear. The reason for 1 squadron being called the “Billy Boys” is so interesting. Aeroplanes are a passion and I love the SAAF. For me modelling the subject is also about the brave men who flew them and their stories. Have watched Dave Hastie’s interviews with Thinus Le Roux several times. https://biltongbru.wixsite.com/ww2-saaf-heritage/interviews Had stopped the build in 2018 and looked at it again recently, about a week or so ago. It is now back on the bench and will be my next build to complete.

Thanks James


Top
 Profile  
Reply with quote  
PostPosted: 03 May 2020, 22:07 
Offline

Joined: 30 Jun 2004, 22:33
Posts: 36
Location: Centurion, South Africa
Hallo all,

Please note this Spitfire was still in the Desert Scheme, thus Dark Earth and Midstone upper surfaces and Azure Blue lower surfaces. With the exception of a very small number of aircraft in the High Altitude scheme of PRU Blue and Med Sea Grey, all the 1 Squadron Spitfire Mk VIII's were left in the Desert finish.

A large number of the Mk VIII's were finished in the Desert Scheme from the Supermarine factory and then sent to North Africa. All the SAAF Mk VIII's fit into these serial number series, i.e. the JF, JG, LV and some MD series aircraft. It was only much later that the Mk VIII,s were finished in the Day Fighter Scheme. These aircraft were a few MDxxx serial aircraft and upwards, i.e. MT and MV ranges. These aircraft were mainly used over Western Europe and Britain itself. By then 1 Squadron was already re-equipping with Mk IX's which they flew until the end of the war.

Kind regards.


Top
 Profile  
Reply with quote  
PostPosted: 04 May 2020, 11:11 
Offline
User avatar

Joined: 17 Dec 2012, 23:13
Posts: 56
Location: Aylesbury United Kingdom
Hello saafcolours,

Thank you, this is good news for me as I want to do JF322 it in the desert scheme and will go with your advice. All other reference sources aside, on having a relook at all the reference photos I have of SAAF Spitfire VIII’s including several of AX-B JF322. The pattern on the nose is the same as the American Spitfire Mk. VIII’s of the 31st Fighter Group 308th Fighter Squadron Based in Italy in 1944 and there are some lovely color/colour photos of the 308th Spitfire VIII “Lonesome Polecat” on the net.

Image from https://www.dailymail.co.uk/news/article-4891372/Stunning-images-Spitfires-donated-RAF.html Note that you have to dodge all the popups here
And
Image from https://www.asisbiz.com/il2/Spitfire/USAAF-31FG/images/Spitfire-MkVIII-USAAF-31FG308FS-HLMM-Bill-Skinner-Pomigliano-Naples-Italy-1944-01.jpg

Regards,

James


Top
 Profile  
Reply with quote  
PostPosted: 04 May 2020, 16:55 
Offline

Joined: 30 Jun 2004, 22:33
Posts: 36
Location: Centurion, South Africa
Hi James,

Please take note that most of the Spitfire Mk VIII's had the cowling camouflage down to almost a "wrap around" scheme. You can see that on "Polecat," as well as on available photographs of most of the SAAf Mk VIII's in 1 Squadron service. On Australian Spit Mk VIII's, the cowling camouflage went almost completely around, with only a small area in the shape of a football in the Azure Blue on the lower cowling.

Cheers,
Piet


Top
 Profile  
Reply with quote  
PostPosted: 11 May 2020, 00:15 
Offline
User avatar

Joined: 17 Dec 2012, 23:13
Posts: 56
Location: Aylesbury United Kingdom
Hello all,

As promised, started work on the project again this weekend. Completed all the bits for the seat frame and modified the fuselage “Frame 12” and “Frame 13” by drilling out the holes in the frame and adding the linkage for the elevator control cables.
Image

The seat was also modified a little as in the photos below.
Image

This was all then test fitted into the fuselage. There was a lot of work involved and not too sure how much you will see once it’s all closed-up.
Image

I also painted the prop and spinner and will post photos of the process during the week.

Cheers
James


Top
 Profile  
Reply with quote  
PostPosted: 11 May 2020, 18:01 
Offline
User avatar

Joined: 17 Dec 2012, 23:13
Posts: 56
Location: Aylesbury United Kingdom
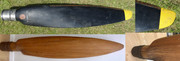
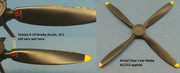
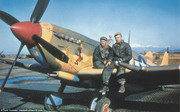
As the Rotol propellers used on these Spitfires are mainly of a wooden construction with a brass sheath on the leading edge as in the photo below.
These blades seemed to have the paint fade on the rear rather than chip and wear off completely like the metal prop blades did.
The paint did chip and wear of the brass leading edge sheath though.
Image

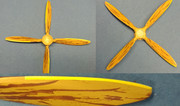
The prop was painted in a wooden colour by mixing Tamiya XF-57 and XF-59 with XF-64 used for the grain.
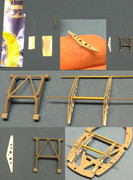
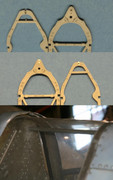
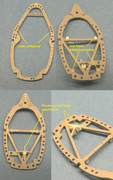
There is very nice photo etch masking templates available, but this will be painted over in black. So, no finesse needed here, only an effect.
The brass sheath on the leading edge of the prop blades is replicated using Mr Color no 8 Silver coated with Tamiya Clear Yellow X-24 to get the brass effect.
This brass portion was then coated with Mig Jimenez AMIG2011 Heavy Chipping Effects to allow chipping here.
Image

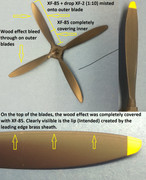
The prop blades were then coated very lightly with Tamiya XF-85 with a drop of XF-2 on the rear outer, so the wood effect can bleed through, and XF-85 on
the front and rear inner. This was then misted over with Future Floor Polish (Yes, it is the original formula that one of my neighbours gave to me). Then a
dirty wash was applied all over and wiped off in the direction of the airflow.
Image

The leading edges of the prop blades were then chipped on the brass sheath using 2000 grit Tamiya abrasive run in the direction of the airflow over.
Image

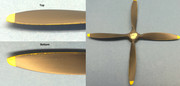
Once the decals were applied, they appeared a little bright, so I misted some Tamiya Smoke X-19 over to dull them a little. The whole blade was then
coated with Alclad Clear Coat Matte ALC313.
Image

Cheers
James


Top
 Profile  
Reply with quote  
PostPosted: 11 May 2020, 19:02 
Offline
Site Admin
User avatar

Joined: 29 Jun 2004, 17:19
Posts: 8397
Woe, awesome detail and build. =D>

_________________
How come every time my ship comes in, I'm at the airport?


Top
 Profile  
Reply with quote  
PostPosted: 12 May 2020, 22:00 
Offline
User avatar

Joined: 17 Dec 2012, 23:13
Posts: 56
Location: Aylesbury United Kingdom
Thanks Dean :smt023

Onto the spinner. This was painted in Mr Color No8 Silver and then coated in Mig Jimenez AMIG2011 Heavy Chipping Effects to allow chipping. After that it was coated in a mixture of Tamiya X-7 Gloss Red mixed with a drop of X-8 Gloss Yellow (1:20) plus a lightened version of this mixed with 1:10 X-1 Gloss White. I use Tamiya gloss colours wherever possible, this way you don’t have to use Future to gloss the paint before a dirty wash and decals. Also, the drop of yellow, to me, stops the red from going a pinkish hue when you lighten it with white.

When dried, some very light chipping was done, then decals, dirty wash and Alclad ALC313 Clear Coat Matte. This was then all put together as per the instructions.
Image

Will do more work this weekend and post early next week.

Cheers,
James


Top
 Profile  
Reply with quote  
Display posts from previous:  Sort by  
Post new topic Reply to topic  [ 16 posts ]  Go to page 1, 2  Next

All times are UTC + 2 hours


Who is online

Users browsing this forum: No registered users and 20 guests


You cannot post new topics in this forum
You cannot reply to topics in this forum
You cannot edit your posts in this forum
You cannot delete your posts in this forum

Search for:
Jump to:  
cron
Powered by phpBB® Forum Software © phpBB Group