The SAAF Forum

Discussion on the SAAF and other southern African air forces.
It is currently 19 Apr 2024, 04:59

All times are UTC + 2 hours


Post new topic Reply to topic  [ 39 posts ]  Go to page 1, 2, 3  Next
Author Message
PostPosted: 21 Jan 2018, 12:42 
Offline

Joined: 31 Aug 2010, 15:01
Posts: 4908
Location: Centurion, Pretoria, SA
Here we go again. Gonna do a silver surfer this time around - delivery scheme. Need to know if a) they were fitted with 1,300 liter tanks and b) fitted with AIM-9B Sidewinders - I know they were in the later buff/green scheme based on piccies off the web. But does anyone have a photo of them fitted with these tanks / missiles in the original natural metal scheme ?

Build this time around will be as simple as possible. No extra stuff except where very obvious i.e. cockpit / seat / u/c legs. No extra detailing in the u/c bays etc. Want to concentrate on getting the natural metal finish looking good.


Top
 Profile  
Reply with quote  
PostPosted: 24 Jan 2018, 19:01 
Offline

Joined: 31 Mar 2015, 19:10
Posts: 305
Location: Pretoria
Delivery scheme, just to add some fun! Not sure about tanks & missiles.

Image


Top
 Profile  
Reply with quote  
PostPosted: 24 Jan 2018, 21:26 
Offline

Joined: 31 Aug 2010, 15:01
Posts: 4908
Location: Centurion, Pretoria, SA
Nice photo Sean. What other piccies do you have in your stash.

I got some photos from Gregair which does show both 1300 liter tanks and AIM-9Bs on natural metal Mirages but not on the same aircraft.


Top
 Profile  
Reply with quote  
PostPosted: 26 Jan 2018, 09:08 
Offline

Joined: 31 Mar 2015, 19:10
Posts: 305
Location: Pretoria
Mistral wrote:
Nice photo Sean. What other piccies do you have in your stash.

I got some photos from Gregair which does show both 1300 liter tanks and AIM-9Bs on natural metal Mirages but not on the same aircraft.


I don't have any with missiles, just this one of 1300's (Thanks again to Daan Conradie for his stash of photo's). Remember that the 1300l tanks in the kit are pretty bad Malcolm, as are the pylons.

Image


Top
 Profile  
Reply with quote  
PostPosted: 26 Jan 2018, 13:46 
Offline

Joined: 31 Aug 2010, 15:01
Posts: 4908
Location: Centurion, Pretoria, SA
Thanks Sean. Seen that photo from Greg. Would love to sift through Daan's collection.


Top
 Profile  
Reply with quote  
PostPosted: 26 Feb 2018, 19:47 
Offline

Joined: 31 Aug 2010, 15:01
Posts: 4908
Location: Centurion, Pretoria, SA
Some progress. Decided to try a new assembly sequence as follows :

Glue lower wing halves to fuselage underside section - make sure correct anhedral is applied - let dry
Glue upper wing halves to previous assembly - I did this to eliminate the seam on the lower wing section just aft of the leading edge.
Glue rear fuselage section to each fuselage half
Glue fuselage halves including the engine and intakes
Glue wings to fuselage halves - add spacer inside if required
It's key to take this last step slowly. Start at rear and work forward ending with a careful alignment of the front section between upper fuselage halves and lower wing assembly
Finally add intake halves
Hopefully all works out - it did for me with a slight misalignment on the intakes - treated that with filler

The fit of this kit is actually not bad - just take your time. The biggest issue is around the forward fuselage and the intakes needing some application of Mr. Surfacer grey primer/filler and some careful sanding and describing of panel lines.
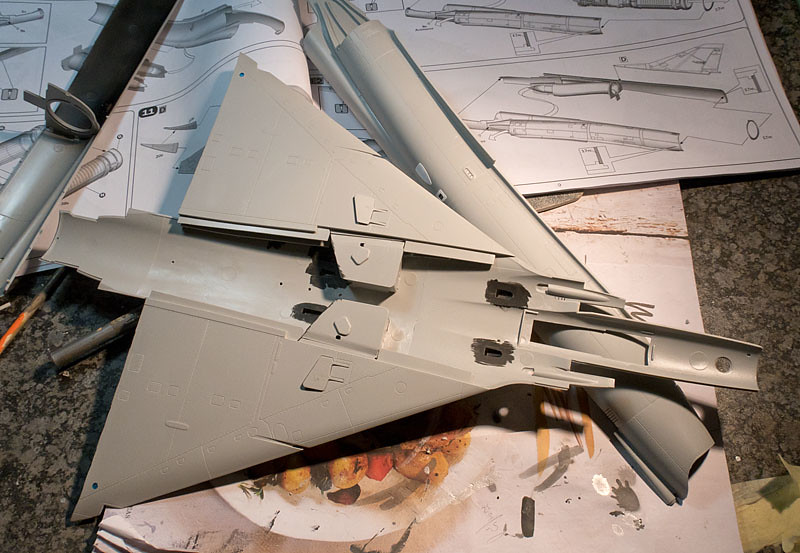
ImageIMG_0343 - 800 by Malcolm Reid, on Flickr
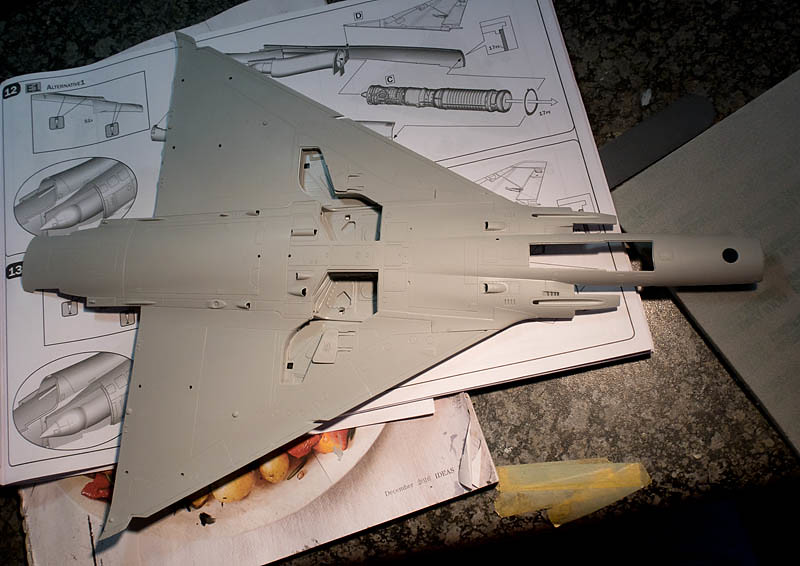
ImageIMG_0385 - 800 by Malcolm Reid, on Flickr
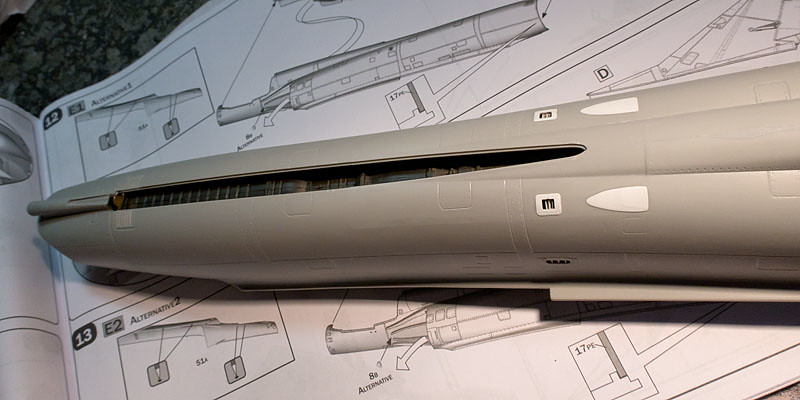
ImageIMG_0384 - 800 by Malcolm Reid, on Flickr


Top
 Profile  
Reply with quote  
PostPosted: 26 Feb 2018, 19:55 
Offline

Joined: 31 Aug 2010, 15:01
Posts: 4908
Location: Centurion, Pretoria, SA
The biggest issue I have with this kit are those really crappy slide mould marks on the rear fuselage - they need to be filed and sanded down. Most of the panel detail and riveting is lost in this process and must be reinstated. I added thin plasticard sections for where the dorsal intakes go. I alos hollowed out the various vents and added grilles :

ImageIMG_0344 - 800 by Malcolm Reid, on Flickr

The nose yet again proves that CAD is not all that it's cracked out to be - a useful tool but only as good as the operator - clearly there was a major cock-up here as the entire radome is too large (and badly moulded). Where is Italeri quality control ? So this is the other part requiring major work - about 30 minutes of careful sanding followed by filling with Mr. Surfacer, sanding, refilling, sanding....you get the idea. And then rescribing all the lost panel line detail. Check how small the nose tip piece in comparison to the radome. Anyway, some basic modelling skills and all comes out OK. Again, take your time.

ImageIMG_0386 - 800 by Malcolm Reid, on Flickr


Top
 Profile  
Reply with quote  
PostPosted: 26 Feb 2018, 20:02 
Offline

Joined: 31 Aug 2010, 15:01
Posts: 4908
Location: Centurion, Pretoria, SA
Oh yes forgot to mention - the entire surface needs a good scrub with 1,000 grit Tamiya sanding sponge to get rid of the pebbly finish. No more than an hour's work on the wings and fuselage pieces.

Then all the odds and sods can be added like the elevon actuators beneath the wing, the elevons themselves and the various smaller scoops / intakes. I added the thin strakes between the intakes and the fuselage using plastic card - the kit supplied photoetch items don't fit.

Then a coat of Tamiya grey primer straight from the can all over the model.

ImageIMG_0391 - 800 by Malcolm Reid, on Flickr

ImageIMG_0392 - 800 by Malcolm Reid, on Flickr

This grey primer is an absolute must if going for a natural metal finish. This primer is amazing stuff and actually enhances the panel / rivet detail as it "cuts" into the plastic. All the blemishes show up and can receive the necessary corrective treatment. After a day's drying time, the primer surface is then treated to a good rub with micromesh 4,000 followed by a final rub of 12,000. This gives a really nice smooth finish to lay the natural metal paint onto.


Top
 Profile  
Reply with quote  
PostPosted: 26 Feb 2018, 20:07 
Offline

Joined: 31 Aug 2010, 15:01
Posts: 4908
Location: Centurion, Pretoria, SA
Another great product I've discovered - Tamiya metallic silver decanted from the can into the airbrush. Great stuff with a brilliant finish :

ImageIMG_0394 - 800 by Malcolm Reid, on Flickr

ImageIMG_0393 - 800 by Malcolm Reid, on Flickr

Tonal variations on silver parts using Tamiya X-19 smoke. Still need some weathering.

Sidewinders with kit decals - not sure if SAAF AIM-9Bs had all these markings but what the heck....

ImageIMG_0395 - 800 by Malcolm Reid, on Flickr


Top
 Profile  
Reply with quote  
PostPosted: 26 Feb 2018, 21:22 
Offline
Site Admin
User avatar

Joined: 29 Jun 2004, 17:19
Posts: 8397
Coming along nicely. =D>

_________________
How come every time my ship comes in, I'm at the airport?


Top
 Profile  
Reply with quote  
PostPosted: 18 Mar 2018, 18:46 
Offline

Joined: 31 Aug 2010, 15:01
Posts: 4908
Location: Centurion, Pretoria, SA
So, here we go - decided to use TS-83 Metallic Silver decanted from the can and applied using the airbrush - attach a straw to the nozzle, seal with some tape, shake vigorously, spray into a bottle whilst not breathing in any of the nasty fumes. The paint seems to boil as the propellant vaporises. Tamiya suggest a base coat of TS-14 Black should be applied before the silver. I didn't and the silver stuck to the primer like the proverbial doggy-do does to your shoe ! :D. It goes on really well and dries in minutes. Only a couple of coats are required to provide a solid coverage.

Here's the first coat on followed by some masking of various panels to vary the tone of the natural metal base colour. I used various shades of Alclad metallics and X-11 silver / X-1 black mixes. Subtlety is the way here - I see modellers going for a very aggressive tonal variation which is not entirely scale accurate if one looks at pics of the real aircraft. Less is more.... :roll:

ImageIMG_0436 - 800 by Malcolm Reid, on Flickr

The distinctive fuselage frames are made darker :

ImageIMG_0437 - 800 by Malcolm Reid, on Flickr


Last edited by Mistral on 18 Mar 2018, 19:16, edited 1 time in total.

Top
 Profile  
Reply with quote  
PostPosted: 18 Mar 2018, 18:51 
Offline

Joined: 31 Aug 2010, 15:01
Posts: 4908
Location: Centurion, Pretoria, SA
Added some darker striping on the fuselage with a mix of X-11 silver / X-1 black mix

ImageIMG_0438 - 800 by Malcolm Reid, on Flickr

Masking for the antennae :

ImageIMG_0439 - 800 by Malcolm Reid, on Flickr

There's a Mirage in there somewhere :

ImageIMG_0440 - 800 by Malcolm Reid, on Flickr


Top
 Profile  
Reply with quote  
PostPosted: 18 Mar 2018, 18:55 
Offline

Joined: 31 Aug 2010, 15:01
Posts: 4908
Location: Centurion, Pretoria, SA
And then the masking for all the red trim and the supersonic GT stripe :shock: . This process took the whole of Friday evening but was well worth the effort - decals just wouldn't have worked as well.

ImageIMG_0442 - 800 by Malcolm Reid, on Flickr

ImageIMG_0441 - 800 by Malcolm Reid, on Flickr

ImageIMG_0443 - 800 by Malcolm Reid, on Flickr

All masking on - ready for some paint :

ImageIMG_0444 - 800 by Malcolm Reid, on Flickr


Top
 Profile  
Reply with quote  
PostPosted: 18 Mar 2018, 19:00 
Offline

Joined: 31 Aug 2010, 15:01
Posts: 4908
Location: Centurion, Pretoria, SA
Before the red goes on, it's necessary to put a coat of gloss white - Tamiya X-2 - as a base otherwise the red will be too dark.

ImageIMG_0445 - 800 by Malcolm Reid, on Flickr

Tamiya X-7 red all over the place :

ImageIMG_0446 - 800 by Malcolm Reid, on Flickr

Another 10 minutes spent carefully removing the masking tape (Tamiya masking tape is the best !!) and she's looking good :

ImageIMG_0447 - 800 by Malcolm Reid, on Flickr


Last edited by Mistral on 18 Mar 2018, 19:18, edited 1 time in total.

Top
 Profile  
Reply with quote  
PostPosted: 18 Mar 2018, 19:02 
Offline

Joined: 31 Aug 2010, 15:01
Posts: 4908
Location: Centurion, Pretoria, SA
A little bit of a mistake - the intake red should go all the way back to join the red on the dorsal panel. So this had to be corrected which was more of an irritation than difficult to do :

ImageIMG_0448 - 800 by Malcolm Reid, on Flickr

There, corrected :

ImageIMG_0450 - 800 by Malcolm Reid, on Flickr

ImageIMG_0449 - 800 by Malcolm Reid, on Flickr


Top
 Profile  
Reply with quote  
Display posts from previous:  Sort by  
Post new topic Reply to topic  [ 39 posts ]  Go to page 1, 2, 3  Next

All times are UTC + 2 hours


Who is online

Users browsing this forum: No registered users and 14 guests


You cannot post new topics in this forum
You cannot reply to topics in this forum
You cannot edit your posts in this forum
You cannot delete your posts in this forum

Search for:
Jump to:  
cron
Powered by phpBB® Forum Software © phpBB Group